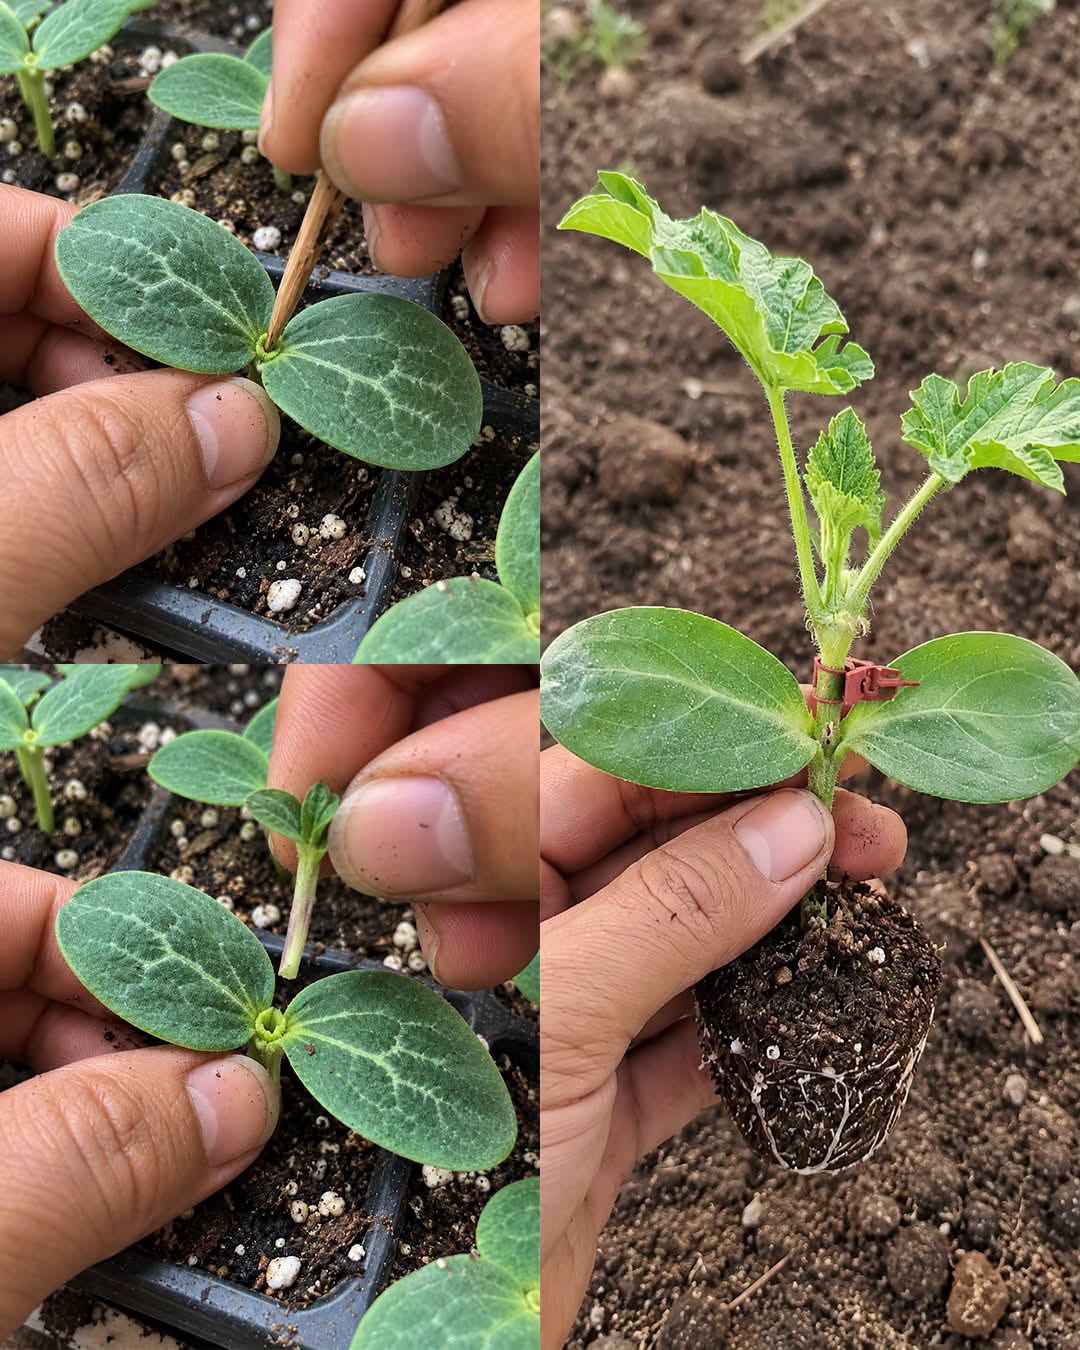
- It shrinks the leaf surface so the pumpkin loses much less water to the air while healing.
- It keeps those big, wide pumpkin leaves from curling up and blocking light from the tiny watermelon sprout.
- By leaving the bottom halves attached, the plant still holds onto the natural sugars and plant-healing energy stored inside the base of those seed leaves. Never cut the two seed leaves completely off at the stem, or the pumpkin will run out of energy and die before the joint can heal.

Step 3: The Healing Week Indoors
Right after you plug the watermelon into the pumpkin, the baby watermelon top has no water pipes connected yet. Left out in the open room air or sunny window, it would dry out and shrivel in an hour. For the next seven days, your job is to keep the air around it wet and shady while the two stems grow together.
Here is how to care for your grafted plant during its healing week:
- Mist and Cover Immediately: Right after plugging the watermelon in, give the whole plant a gentle mist of water from a spray bottle. Then place a clear plastic bag over the pot (tied loosely at the bottom) or set your pots inside a clear plastic storage box with the lid closed. You want the air inside to stay damp and misty, with little water droplets visible on the plastic.
- Keep Out of Direct Sunlight for Three Days: Set the covered plants in a warm room (around normal room temperature) away from sunny windows for the first two to three days. Bright sunlight heats up the plastic cover and forces the tiny watermelon leaves to lose moisture before their water pipes are hooked up.
- Give Them Gentle Light on Day Four: Starting around the fourth day, move the covered plants somewhere with bright, indirect room light or under a gentle indoor lamp, still avoiding hot, direct sunbeams.
- Slowly Let Fresh Air In on Days Five to Seven: After five days, you will notice the little watermelon top standing up perky and bright green, with a tiny new leaf starting to grow in its center. That means the water pipes have fused! Do not pull the plastic bag off all at once, or the sudden dry room air will shock the plant. Instead, untie the bottom of the bag or crack the storage box lid open just an inch on day five, open it halfway on day six, and take the cover off completely on day seven.
- Move Into the Sun: Once the plastic cover is off and the plant stays upright without drooping, slowly introduce it to sunny windowsills for a few days before planting it outside in your garden.
Tips for Growing Grafted Watermelons in the Backyard
Once your pumpkin-rooted watermelon is healed and planted out in your sunny garden bed, it will grow much faster than any regular watermelon plant you have ever owned. Keep these four simple rules in mind during the summer so you get the best, sweetest fruit possible:
- Never Bury the Joint Under the Dirt: When you transplant your seedling into the garden, make sure the spot where the watermelon meets the pumpkin stem stays at least an inch or two above the soil line. If dirt piles up against the watermelon part of the stem, the watermelon will sprout its own weak roots straight into the ground. If that happens, soil diseases can sneak up through those side roots and ruin all your hard work.
- Pinch Off Any Sneaky Pumpkin Sprouts: Every once in a while, a tiny green sprout might still try to pop out from the pumpkin stem right next to those two old half-leaves. Check the base of the stem once a week during the first month, and if you ever see a fuzzy pumpkin shoot poking out below the joint, pinch it off right away with your fingers.
- Go Easy on Fertilizer: Because pumpkin roots are such greedy feeders, your watermelon vine does not need nearly as much plant food as a normal watermelon. Too much rich fertilizer makes the vine grow giant dark-green leaves and thick white melon rinds at the expense of sweet red fruit. Give it about half the plant food you would normally use.
- Hold Back Water Right Before Harvest: Pumpkin roots love to pump water into the vine right up until the day you pick the fruit. To make sure your watermelons taste extra sweet and crisp, stop watering the plant completely for the last seven to ten days before you harvest a ripe melon. Letting the soil dry out during that final week forces the vine to pack extra natural sugars into the red flesh instead of filling it with plain water.
Common Questions Beginners Ask
- Can I use seeds scooped out of a grocery store pumpkin or squash? Yes! As long as the pumpkin or winter squash was fully ripe when you bought it, you can wash and dry the seeds and use them as root plants. Standard orange field pumpkins, butternut squash, hubbard squash, and bottle gourds all make fantastic, vigorous root bases for watermelons.
- Does this work with seedless watermelons too? It works wonderfully with both regular seeded watermelons and seedless varieties. In fact, seedless watermelon sprouts are notoriously weak when they first come out of the ground, so giving them a pumpkin root makes them much easier to grow at home.
- What if my watermelon top droops a little when I first take the plastic bag off? Do not panic. If the watermelon leaves start to look a little floppy an hour after you open the plastic cover, simply mist the leaves with water and close the bag again for another day or two. It just means the new connection inside the stem needs a little more time to finish building its water pipes.
With just a packet of seeds, a toothpick, and a few minutes of careful kitchen-table surgery, you can turn fragile watermelon sprouts into the strongest, healthiest vines in your neighborhood—and enjoy big, sweet backyard melons all summer long.
👉 Click the button below to continue reading. (>)