Anyone who has tried to grow watermelons in a backyard garden knows how heartbreaking they can be. You plant the seeds, watch the green vines spread across the dirt, and wait excitedly as the first little melons begin to swell. Then, right in the middle of a hot summer week, the leaves suddenly droop. Within days, the entire vine shrivels up and dies, leaving you with nothing.

Most of the time, the problem is not your watering schedule or the weather. The problem is right underneath the dirt. Watermelons have very fragile, shallow roots that easily fall victim to soil sickness, cold spring dirt, and root-chewing pests.
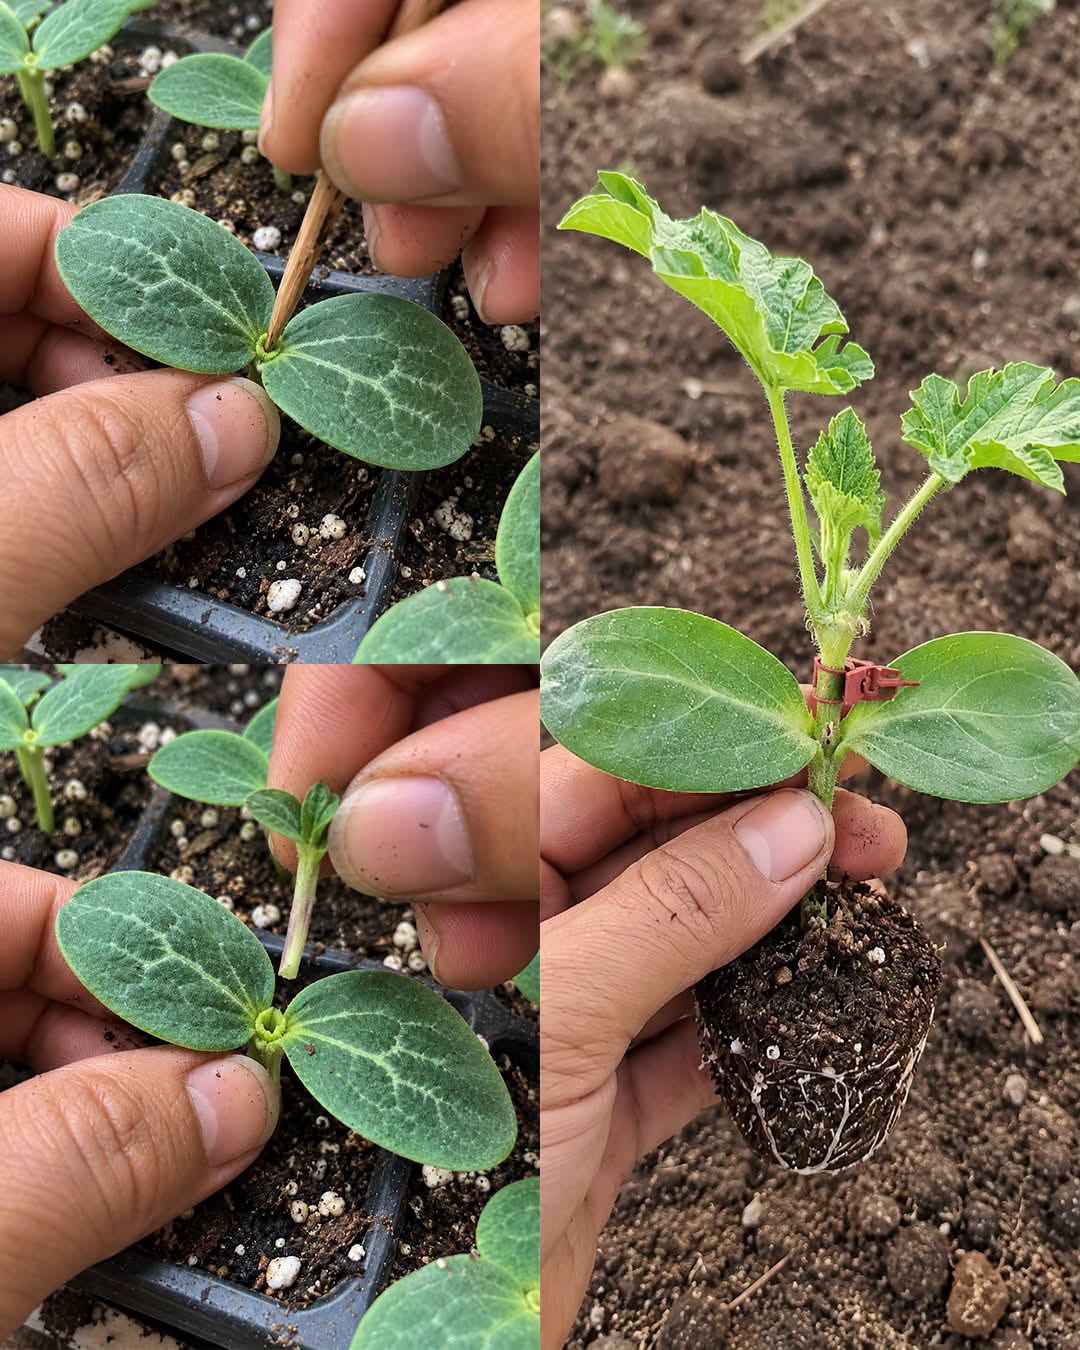
Thankfully, there is an old, clever gardening trick that completely solves this problem, and you can do it right at your kitchen table using a wooden toothpick and a razor blade. By taking a baby watermelon sprout and plugging it directly into the stem of a baby pumpkin plant, you give that fragile watermelon the unstoppable root system of a pumpkin.
Here is everything you need to know about how this homemade plant-joining trick works, why it makes such a massive difference in your garden, and how you can do it yourself step by step.
What Happens When You Join a Watermelon to a Pumpkin?
Joining two young plants together so they grow as one is called grafting. While that might sound like a fancy laboratory experiment, it is actually very simple because watermelons and pumpkins belong to the same big plant family. Think of them as distant cousins that share the same kind of internal water pipes.
When you cut the top off a baby pumpkin plant and plug a baby watermelon stem into the middle of it, the plant heals itself just like human skin heals a small cut. Within a single week, the tiny water tubes inside the pumpkin stem connect and lock together with the water tubes inside the watermelon stem.
Once they heal, the two plants work together with two distinct jobs:
- The Bottom Half (The Pumpkin Root): Stays underground and acts like a heavy-duty engine, pumping water and plant food out of the dirt day and night.
- The Top Half (The Watermelon Vine): Grows all the leaves, flowers, and fruit above the ground.
Because only the water pipes connect—and the two plants never mix their genetics—the top vine stays one hundred percent watermelon. It will never grow a weird half-pumpkin fruit, and your melons will still look and taste like real watermelons.
Why a Pumpkin Root Makes Such a Powerful Difference
Swapping out a watermelon’s weak roots for a pumpkin’s tough root system changes everything about how your plant grows in the backyard. Here is why this technique is so powerful for home gardeners:
- Natural Protection Against Soil Sickness: Watermelons are famous for dying from a soil fungus called wilt. Once this fungus gets into your garden dirt, it stays there for years and clogs up the water pipes inside normal watermelon roots. Pumpkin roots are naturally immune to watermelon wilt. Even if your garden soil is full of that fungus, a pumpkin root will ignore it completely and keep feeding your watermelon vine.
- A Deeper, Wider Underground Reach: A normal watermelon root system stays small and close to the surface. A pumpkin root system spreads out wide and digs deep into the earth. It acts like a giant sponge that pulls in far more water and natural soil minerals than a watermelon could ever reach on its own.
- Faster Growth in Cool Spring Soil: Regular watermelon roots hate chilly dirt. If you plant them out in the garden too early in the spring, they sit still, turn yellow, and refuse to grow until the soil warms up. Pumpkin roots do not mind cool dirt at all. They keep pumping nutrients even on chilly spring mornings, giving your watermelon vine a huge head start on the season.
- Toughness Against Heatwaves and Heavy Rain: During scorching summer afternoons, normal watermelon vines often wilt because their small roots cannot pump water fast enough to keep up with the sun. On the flip side, heavy rainstorms can drown fragile watermelon roots and make them rot. Pumpkin roots handle both dry heat and muddy soil with ease.
- Bigger Melons and Higher Harvests: Because the vine never struggles for water or food, it grows thicker stems and bigger, greener leaves. A healthy plant with extra energy can support more fruit at once, and the melons it produces grow noticeably larger and heavier.
- No More Rotating Garden Beds: Normally, you cannot plant watermelons in the same garden spot two years in a row without diseases building up in the dirt. If you have a small backyard with only one sunny patch, using pumpkin roots lets you grow watermelons in that exact same spot every single year.
Simple Supplies You Need at Home
You do not need any special greenhouse gear or expensive tools to do this at home. You can gather everything from around the house:
- Pumpkin or Squash Seeds: Regular field pumpkin seeds, winter squash seeds, or bottle gourd seeds all work great as the bottom root plant.
- Watermelon Seeds: Any variety you love to eat, whether it is a giant picnic watermelon or a small, sweet icebox type.
- Small Starter Pots and Potting Soil: Ordinary seed-starting trays or small plastic cups with drainage holes poked in the bottom.
- A Clean Razor Blade or Craft Knife: You need a very thin, sharp blade so you can slice the delicate baby stems cleanly without crushing them.
- A Wooden Toothpick or Bamboo Skewer: Whittle or sand the tip of a wooden toothpick or skewer so it forms a slim, slightly flattened point. This is your tool for poking the pocket in the pumpkin stem.
- A Water Spray Bottle: For misting the plants with clean water so they stay fresh while healing.
- Clear Plastic Bags or a Clear Plastic Storage Tub: To cover the newly joined plants and trap moisture in the air while the cut heals.
Step 1: Timing Your Seeds Before You Start
The secret to an easy fit is making sure your baby pumpkin stem is slightly thicker than your baby watermelon stem when grafting day arrives. Think of the pumpkin stem as a sturdy socket and the watermelon stem as a slim plug that needs to slide inside it.
To get the sizes right, follow this simple planting schedule:
- Plant the pumpkin seeds first: Sow your pumpkin seeds in warm potting soil indoors.
- Wait three to five days, then plant the watermelon seeds: Because watermelon stems are naturally skinnier, planting them a few days after the pumpkins ensures both seedlings reach the right stage at the exact same time.
- Always plant a few extras: Sow a handful of extra pumpkin and watermelon seeds so you can pick seedlings that match up nicely in thickness and have extras to practice on.
- Watch the leaves to know when they are ready: Your plants are ready to join about seven to ten days after sprouting. At this stage, the pumpkin seedling will have its first two flat, oval seed leaves wide open, and you will see the very first tiny, rough true leaf just starting to peek out right between them. Meanwhile, the baby watermelon seedling will have its two small seed leaves open and a slim, straight stem underneath.
Step 2: The Hole-in-Stem Method Step by Step
Before you begin, set up at a clean table out of direct sunlight and wash your hands well with soap and water. Wipe your razor blade and wooden toothpick with a little rubbing alcohol and let them dry so you do not introduce germs into the fresh plant cuts.
Follow these steps carefully for each plant:
- Scrape Out the Pumpkin’s Center Growing Point: Look closely at the top of the baby pumpkin stem, right between its two flat seed leaves. You will see a tiny, fuzzy bud where the first real pumpkin leaf is starting to form. Use the tip of your blade or your fingernails to pinch and scrape that center bud completely out. This is the most important detail of the whole process. If you leave even a tiny piece of that center growing bud behind, the pumpkin will keep trying to grow its own pumpkin vines instead of sending all its energy into your watermelon.
👉 Click the button below to continue reading. (>)
ADVERTISING
ADVERTISING